Showing posts with label DIY. Show all posts

Wednesday, October 16, 2013

Muddy Dirty Dye

It has been a while since I posted.  Last week I was a bit under the weather with a cold & sinus problems, so I wasn't up to doing a lot, not to mention that red, raw noses don't make for great pictures. But I was able to get this FABULOUS jacket refashioned up a bit.
It is a great military jacket & fits me like a glove.

This was a great purchase off of my friend who it didn't work for after she went through Dressing Your Truth.  She knew it would be loved & appreciated by me ;-). 

This jacket just needed some dirtying, so I finally got the details down of my dirtying process to share with you all.
These are the 3 dyes that I use.  I call this my "Muddy Dirty Dye".  Most dirty recipes are yellow, this one is a great brown base that looks gorgeous on a dark denim.  I shared another denim refashion a while ago & I used this recipe on it.

Muddy Dirty Dye Recipe

28 cups boiling water
1/3 cup tan dye
2 T dark brown dye
2-3 T orange dye (less on lighter denim, more on darker denim)
1/2 cup salt.

Stir everything together.  Get your article of clothing completely wet before placing in the dye.
I always use a big plastic storage bin and I wear big rubber gloves while working on it. I place item in and move around for about 15 minutes.  I move it constantly & massage the fabric to make sure it takes the dye really good.  I wring it out & rinse it in cold water until the water runs pretty much clear (I do this process in my stainless steel kitchen sink).  Throw in the washing machine on a Handwash cycle on cold & lay dry or tumble dry on extra low heat so it doesn't get that hard, stiff feel that some jackets get when they have been laid out to dry.
You can see how great it looks with being more brown.
The side by side looks amazing.
I paired it here over my fab mustard sweater shirt, my new Walmart skinny jeans I got for $13, my everyday brown boots (you have seen a lot & will continue to see).  It is hard to see, but all of the jewelry are Lindsi originals ;-).  Happy Muddy Dirty dyeing!


Tuesday, October 1, 2013

Casual dress to Pencil skirt

My sister gave me this casual cotton dress back a while ago.  
I wore it a few times, mainly as lounge clothes up at our cabin.  I felt frumpy in it, so I decided it was time to figure something out with it so I would enjoy wearing it.  I cut the top part completely off, turned it inside out & slipped it on as a skirt.  I then pinned down the sides to get it to form to my body to create a pencil skirt.  I may eventually do an elastic waist, but for now I left the top edges raw.  It is always under shirts or under a belt, so it's not a big deal right now.

I did want to show a new concept today with my item-outfit put together.  I wanted to show how you can take an inspiration picture, like this one I found on Pinterest.
The idea was really cute & different, but the black doesn't work for me.  So I took the inspiration & made it work for me
I used the skirt I made that is brown & cream small stripe, brown leggings & my cream sweater.  The original picture had a plain scarf, but I needed color & texture, so I made that the pop of my outfit.  Something I do often & love to do is put bracelects over my long sleeves.  I was excited to see this picture do that.
So, when you are searching Pinterest for your perfect style, maybe consider that pictures that you wouldn't pick for color purposes, have some great style ideas.  I look at pictures to see if there is anything at all that can inspire me & spark new ideas.  I love having a "challenge" to create my outfits.

In the future, look for more inspiration challenge posts.  It is a great way to step out of the box of what you would normally select to wear, and I am all about trying new things!

Monday, September 30, 2013

Red/Copper belt redo

Back last year, I bought this pink belt for about $5 from Charming Charlie.  
I loved the shape & texture, but the color was a bit soft & light for me.  I decided to get my paint on with it.
I painted the elastic band with fabric paint & a sponge while pounding the paint in as deep as I could, doing my best to get it as even as I could.  After painting the band with Brick fabric paint, I then took My Angelus Brick leather paint to the vinyl (after rubbing it with Acetone).  After that dried, I took my cotton rag with so e water & rubbed the whole vinyl down with Copper leather paint in order to give it a metallic iridescent sheen to it & to enhance the texture.  Painted the buckle rid with Gold nail polish & let it all dry.
The color & look are gorgeous!  Now that I have worn it a few times, I think I will paint the whole thing with Pod Modge to help seal it as the buckle has been digging in on the sides & ruining the belt. I think the Mod Podge would help protect it like it did in my Tissue Paper shoe post.
Here is the outfit I put together with the belt.  This is one of those outfits that I put together for the first time and felt AMAZING in!  My favorite shoes & skirt combined with a ruffled front button up shirt with a gold metallic cardigan & my painted belt.  I loved the whole outfit & how I felt in it and the belt was a great color for the combo.  Expand your vision & possibilities & see what you can come up with!


Monday, September 23, 2013

Plain Tan Skirt Criss-cross sewing

 I bought this plain tan skirt back quite a few years ago.
It was alright, but I didn't choose to wear it much.  I mainly wore it when I was pregnant because it was stretchy and comfortable to fit on the belly.  but during my last pregnancy, I got it stuck in a metal folding chair and got grease on it that stained.
 The mark wasn't that big, but it was enough for me to not feel comfortable to wear it, but I had an idea on how to save it.
The first step was to get rid of the bow.  I don't like bows, so I just tied some knots  down the ties and sewed them straight across to create a knotted looking belt..... some texture.

The next step was to create some texture in the body of the skirt and to hide the grease mark.  This particular skirt is sewn in sections, so I just worked within each section.  I just folded over and sewed right along the edge, creating a tiny seam.
 I created a criss-cross pattern but did not do any measuring of at all.
I made sure to create a seam over the grease mark so to hide it and not make it noticeable.  I continued all the way around the whole skirt sewing random criss-cross patterns and working in each individual section of the skirt.
This shows it more close up,
and here it is in an outfit.  The texture is so great now and I can actually see myself choosing to wear this now.  I paired it with a new jacket top I bought at the thrift store a few days ago, the cuff from my last post and my great leopard belt I bought from a friend.  Where I live, it has been feeling more and more like fall which means that the layers will be piling on (but I love).  Best time of year for me ;-)

Tuesday, September 17, 2013

Denim Blazer Overhaul

12 years ago I got a job at the Nordstrom Rack.  The best perk of course was the fact that I could get my hands on some great clothes at a discount.  This jacket was one of those "have-to-have" pieces.
Remember, I said 12 years ago ;-)  I wore it a few times and lost the tie belt and never wore it again.  I couldn't really get myself to get rid of it, yet I quite despised the length, the sleeves and the color..... but I altered it to fit me like a glove.  So of course this summer I took to it finally.  I started off by cutting the bottom off like I did in this post, then the sleeves had to go.  I fold the jacket in half and used my straight edge and rotary cutters on all of it, making sure it was even on both sides.  Since I love raw edges, I just left them as they really were perfect for me.  The next step was to give it a dark dirty bath.  If I remember correctly, I used a tan, small amount of Sunshine orange and a small amount of dark brown.  The results were amazing.
It really is amazing how those few fairly simple steps completely transformed this piece.  It went from looking old and outdated, to very hip and stylish.

Here I show it with a big belt over and paired with my refashioned skirt.  I bought this skirt off of the FB Yard Sale page for a few dollars, but it was way too big and was a white and grey striped coloring.  Gave it a tan bath and while wearing the skirt inside out, pinned it down the front to get a perfect fit to my body and curves.

The result is a perfect edgy skirt that was pretty much made for me.  I adore this outfit and get compliments like crazy when I wear it all together.

Monday, September 16, 2013

Marbleizing Dye Technique

This shirt is going to be the shirt that goes down in history for having the most refashions done to it!  It started out like this....
 GORGEOUS, teal black that I really did love, but every time I wore it, it felt way too black for me and I didn't feel quite right... but that teal color is my FAVORITE!  I thought I could bleach it and just turn it back solid teal.....
 So, I bleached it.  It turned tan.
 Attempted to bleach it teal with a Kelly Green and Royal Blue mixture and it turned out this color.  VERY muted and I was not loving....
 So in a very short period of time, it visited all 3 of these.  I left it that muted green for a while, but never wore it because I really didn't like the color for me.... so why not bleach it again and try something different.

(picture forgotten here)- but I took it in it's bleached tan state and wrapped rubber-bands all over it.  I tried to do it at angles so that there wouldn't be stripes straight across, I wanted lots of texture and movement, not stripes.  I then stuck it in a seriously concentrated mixture of Scarlet Red dye.
 This is what it looked like when all soaked in and wrapped up still.  I undid all of the rubber-bands and this is what I had.
 A really great rich red and tan, but it still needed to be washed at this point (yes it did fade and bleed, but whatever at this point ;-) )
 The next matter of business was the black rhinestones.  I couldn't stand them anymore and decided to take my brown finger nail polish and quickly coat each one with the brown.  You can see that the left upper section has brown and the right is black still.  It was just that bit of change to tone it down and not be so stark.
 Here is it outfitted.  You can see that it did fade and I have to admit I was bummed about how much it faded.... I LOVED the deep rich red it started out to be, but sometimes it is just really hard to get the really deep coloring with dyeing.  At least it is to a point that I will for sure wear it often.  This shirt is so blasted soft and comfortable, that I wasn't willing to give it up.
I paired it with this fabulous belt that my neighbor picked up at the thrift store and gave to me.  I didn't have to do a thing to it, it was perfect as is.... it's amazing how someone considered this trash I consider a serious SCORE!  I would have paid decent money for a belt like this because it would be a staple!  The boots were a great find for about $6 at a Yard Sale.... The shirt itself was a thrifted find also, originally from the Buckle I believe.  A store I love but never willing to pay their prices.

So I am calling it quits for this shirt.  I think 5 refashions is enough for 1 shirt.  Aren't you glad you have me to make mistakes and test things out for all of you so you know what to do and what not to do..... ;-)

Friday, August 30, 2013

Belt and shoes painted to Mustard Yellow

 Now, I have said this before, but I will say again.  Some of the things I go to refashion, people are going to think "Why would you change that?".  But some of the things I own, just aren't right for ME, so I do what I need to to make them right for me.
This rockin belt I bought at Charming Charlie back a year a half ago for a whole $3 (SCORE).  I loved it, but the grey-blue color just wasn't right for me.  I decided to do something crazy & decide to paint the entire thing, detail and all.
I got out my little tiny detail brush and spent an hour or 2 painting over the tiny detail weave from blue to brown. 
You can see the before and after here with one side done.

Then after all of that, I got out the Acetone (not fingernail polish remover) and rubbed down the leather/vinyl section.  I chose to paint the belt Mustard Yellow and give it a bit of a vintage look.

 The metal was originally a silverish color, so I took my gold fingernail polish and carefully painted the metal all gold on the hook.
Now, I forgot to take pictures of this part on this belt, but I do have this one from another belt I redid.  This is how I change the color of the elastic backing of the belt.  Tape off around the side where the leather touches the elastic.  Next take a sponge and dip it in your matching fabric paint to the leather paint just used.  Take the sponge and literally pound/stipple the paint into the elastic. This definitely works best if you choose a color fairly close to the original color and it would be best to get an Opaque Fabric Paint instead of a sheer Fabric Paint.  If you would like, you can set the fabric paint with heat under an iron (probably place the item between 2 old towels to be safe.

I also had these hot pink shoes that my mom gave me.  I liked the idea of the shoes, but I am not much of a pink girl, especially hot pink.  I stripped them as usual with my Acetone really good and just painted them over with the Mustard Leather Paint.
 As of now, these shoes stripped the very best which means that the leather paint is very securely on there.
 I chose to show this belt and shoes paired with rich primary colors.
 A close up of the belt while on.
Or in a more casual way paired with my rockin hand painted leopard shoes.
Random note, the rich brown tank I am wearing underneath used to be black.  I bleached it and it turned this yummy brown.

After doing all of this painting, I did get the idea that the detail on the belt would look really awesome in Purple as a contrast to the yellow.... maybe one day I will break down and do that, but it will limit my color combinations if I do that..... My brain is always working on how to change things up ;-)  For now, I will leave it and put my efforts into other projects to share with all of you UBs!  (Unique Beauties!)

Monday, August 26, 2013

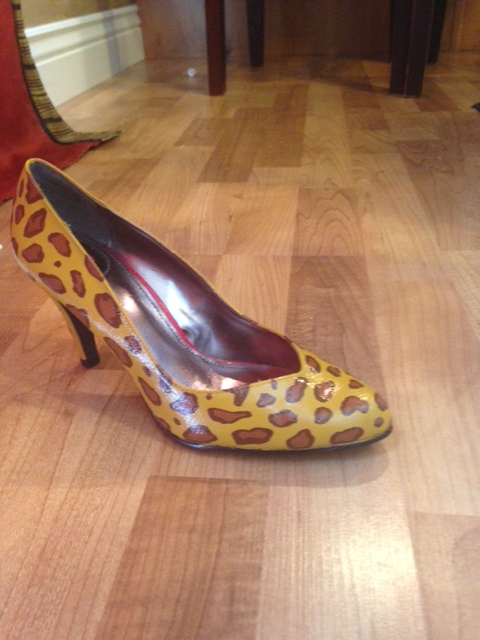
Hand-painted Leopard Shoes

          Do you love leopard as much as I do?  Leopard is my POWER pattern!  I feel very powerful and confident when I am in leopard, so that was of course my inspiration for these shoes.

          I purchased these little red beauties for a whole $2 from my local Facebook yard sale page. 
         Some people would think that there is nothing wrong with them, but they are just too bold for my style and coloring.  After buying them I thought "why did I even buy these?  I don't care for this color for me...."  But then I had a thought and I was bound to do it.....Hand painted leopard shoes!

       #1- The first step to creating this was to rub my shoes down with pure ACETONE.  NOT fingernail polish remover.  With a cotton rag, rub and rub to see if you can get the glossy finish off (sometimes it all comes off and sometimes you just can't get it off).  *please use rubber or latex gloves during this process and do it outside where it is ventilated.

       #2- The second step is to get your colors figured out.  I use Angelus leather paints that have to be ordered online.  The base color I chose to be Mustard and the spots are Cognac.
     The base I used a larger art brush & gave it a good 2-3 coats.  After letting that dry, I used the little paint brush in the paint and free handed some spots.  I created a free pattern as I wanted them to be a bit unique.
      After getting all of the spots on and letting it dry, I took the Light-brown paint and drew random borders around the spots.
     With this picture, you can see the random pattern.  It is really cool around the heel and didn't take it all around the shoe.

     My original plan was to just stop at this point, but as you can see, it was a bit bright and animated for my taste and I desperately needed to find a way that I could tone down the look.  Now, with part of my background being in mural painting and wall staining, I took some techniques from that and created an over color that would tone down the yellow and make it look aged.  Here is what I did.  In an old plastic bowl, I dabbed a little bit of the dark brown paint and a pinch of water.  I took a cotton rag and dabbed it both in the brown paint and water and created a wash out of it.  I swirled that all around the the shoes and created some spots darker and some lighter so get the aged/worn affect I wanted.
       You can see here in the picture that it created a very beautiful, yet fun look that I absolutely love and adore!
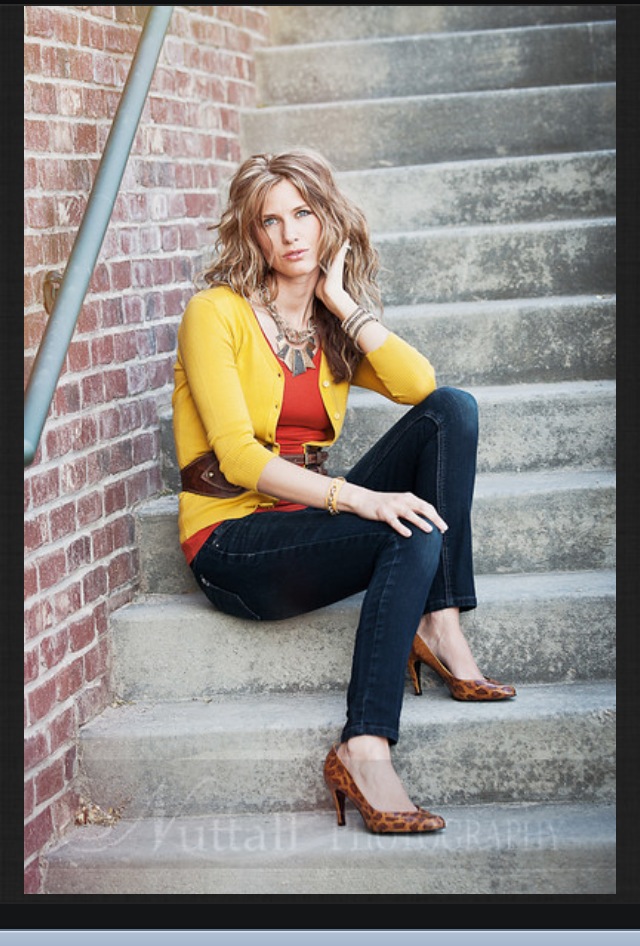
     I even wore them in a photoshoot I had back a few months ago.  So, for a few bucks for some shoes and some paints (that of course stretch into many more projects), I now have a FABULOUS pair of shoes that I get compliments on ALL THE TIME!  So try it!  Don't be afraid because you say you aren't an artist.  This is not difficult and the end result is well worth the bit of time put in.