Friday, August 30, 2013

Belt and shoes painted to Mustard Yellow

 Now, I have said this before, but I will say again.  Some of the things I go to refashion, people are going to think "Why would you change that?".  But some of the things I own, just aren't right for ME, so I do what I need to to make them right for me.
This rockin belt I bought at Charming Charlie back a year a half ago for a whole $3 (SCORE).  I loved it, but the grey-blue color just wasn't right for me.  I decided to do something crazy & decide to paint the entire thing, detail and all.
I got out my little tiny detail brush and spent an hour or 2 painting over the tiny detail weave from blue to brown. 
You can see the before and after here with one side done.

Then after all of that, I got out the Acetone (not fingernail polish remover) and rubbed down the leather/vinyl section.  I chose to paint the belt Mustard Yellow and give it a bit of a vintage look.

 The metal was originally a silverish color, so I took my gold fingernail polish and carefully painted the metal all gold on the hook.
Now, I forgot to take pictures of this part on this belt, but I do have this one from another belt I redid.  This is how I change the color of the elastic backing of the belt.  Tape off around the side where the leather touches the elastic.  Next take a sponge and dip it in your matching fabric paint to the leather paint just used.  Take the sponge and literally pound/stipple the paint into the elastic. This definitely works best if you choose a color fairly close to the original color and it would be best to get an Opaque Fabric Paint instead of a sheer Fabric Paint.  If you would like, you can set the fabric paint with heat under an iron (probably place the item between 2 old towels to be safe.

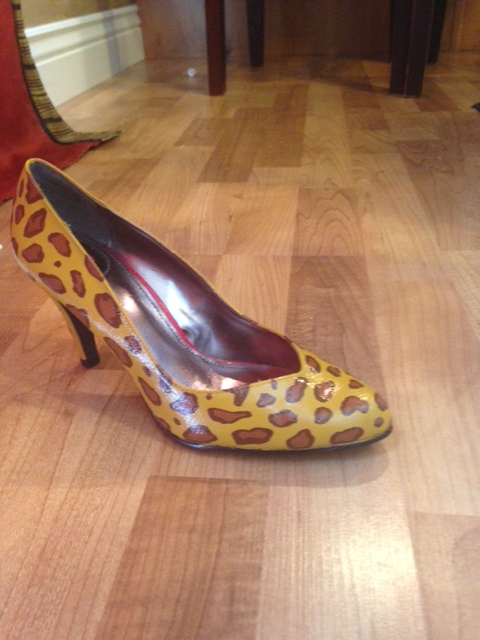
I also had these hot pink shoes that my mom gave me.  I liked the idea of the shoes, but I am not much of a pink girl, especially hot pink.  I stripped them as usual with my Acetone really good and just painted them over with the Mustard Leather Paint.
 As of now, these shoes stripped the very best which means that the leather paint is very securely on there.
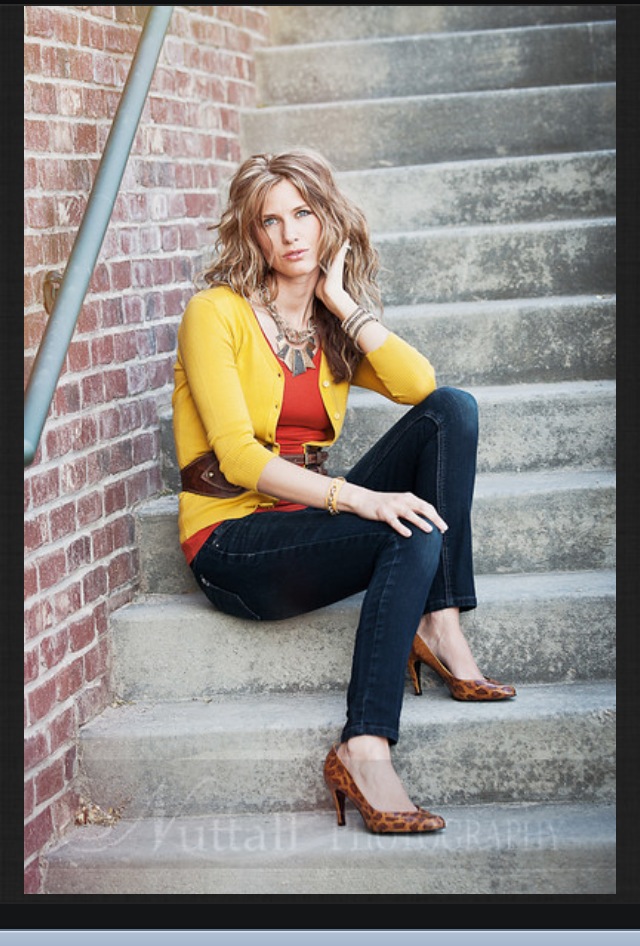
 I chose to show this belt and shoes paired with rich primary colors.
 A close up of the belt while on.
Or in a more casual way paired with my rockin hand painted leopard shoes.
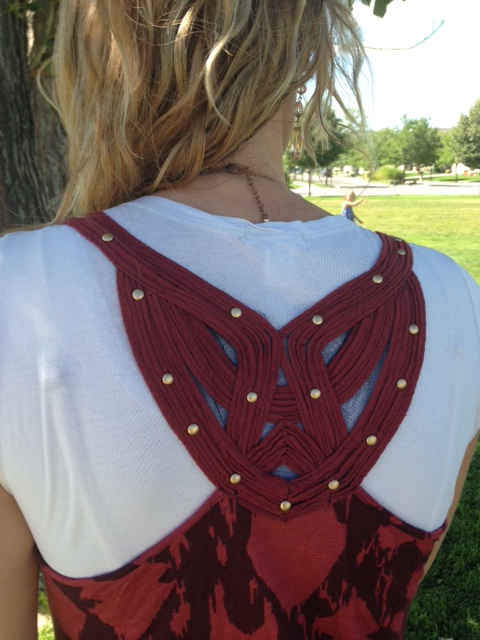
Random note, the rich brown tank I am wearing underneath used to be black.  I bleached it and it turned this yummy brown.

After doing all of this painting, I did get the idea that the detail on the belt would look really awesome in Purple as a contrast to the yellow.... maybe one day I will break down and do that, but it will limit my color combinations if I do that..... My brain is always working on how to change things up ;-)  For now, I will leave it and put my efforts into other projects to share with all of you UBs!  (Unique Beauties!)

Thursday, August 29, 2013

Facebook Page

     I have decided to create a facebook page, feel free to visit https://www.facebook.com/peacocksandleopardslindsijo and like it to receive the latest updates and posts in your news feed.

Tan/Navy tank turned Red/Purple tank- Bleach and Dye

Something about me, I am not afraid to take risks.... at least in the smaller ways ;-)
 I had this shirt that I absolutely loved everything about it, except that I am not a fan of Navy.  Not to mention that the navy had kind of bled and created some funky looking blue marks all over the shirt.  The pattern on this shirt was perfect and funky, I absolutely LOVED the back weave pattern and of course was determined to find a way for me to absolute love EVERYTHING about it.... so I took a chance and I threw it in the washing machine on the soak cycle with about a 1/2 cup or so of bleach and decided to see what it would do.  Of course I got moving and forgot to snap a picture of the bleached look, but the navy was faded a bit and the tan sections were white.  The navy blue weave section turned a pinkish tan color.  As it turned out all bleached, it wasn't going to work, but I wasn't planning on stopping there.

After the bleach I created a dye bath in a Wine Rit dye.  With my background in art and design  (lots of color mixing in my background), I knew that the white section would turn red and the red mixed with navy would hopefully give me purple.  Which is exactly what it did!
 This is what it turned out to be!  The weave went red which is gorgeous and the shirt colors turned out perfect.
 I love this back which is the real reason why I love this shirt so much.
 The metal studs were originally silver and I took my Gold fingernail polish and turned them all to gold very carefully.
 I paired this top with a very stylish yet comfortable pair of shorts to take my girls to the park.  So with this great top, I was able to put together a great Mommy-on-the-go outfit that is comfortable and easy to move in, yet is way more stylish than a pair of work out clothes or lounge outfit.
 So, the before and after.

I took a chance and I ended up LOVING this one!
In a future post, I will go over the steps of dyeing and bleaching with pictures.  This was a project before the blog was created and I was lucky to have taken the pictures I did :-)

Take a chance, you may love what you come out with.

Tuesday, August 27, 2013

Sharpie to Jean Stitching

     Have you ever had a pair of jeans and thought "I would really love these if the stitching wasn't so white?"  I doubt I am the only one out there that doesn't care all too much for WHITE stitching..... Well, some people may call me crazy, but I do have a way that I change all of my white stitching on my jeans......
      YEP, I use a Sharpie or a permanent marker!!!  I know many people out there wouldn't never care to take the time to do this, but it has made a big difference on a lot of pants.
     Out of order, but these are jeans that are all done with the marker coloring.  I like to use either copper, gold or brown.
      This shows what the before and after look like.  you can see that there is a BIG difference!  The top pair, I honestly wouldn't even wear them because I hated the white crowns so bad.  The reason I had them was because my husband really liked them on me.  After coloring the stitching and dipping them in a tan dirty dye, I actually really liked them!
      Another pair that you can see the process and what a difference it can make.
     I even did some coloring on the holey parts.  

It has been a few months since I have done these particular jeans and I will tell you this.  I have used actual Sharpies and I have used a cheaper brand of permanent marker and I liked the cheaper brand better.  The color has stayed longer through washes and the marker itself lasts longer during the process.  Like I mentioned though, it does fade.... my thinking though, faded gold or brown is still better than stark white.  So, it's your call, is it worth your time?  I actually did one of the pairs while on a road trip in the car!  I liked that I was accomplishing something while in the car ;-)

Photo Shoot Necklace

     Who here loves FREE stuff?  I definitely do, and I am sure there isn't a soul out there who doesn't.  I was offered this fabulous necklace for free by a friend.  She had ordered this and they sent her the wrong one.  
     She had originally ordered a brown one and they sent her black, but they were letting her keep the black.  Knowing that I love to refashion and try new things, she sent me the black one.  Now..... I am fully aware that people are sitting there saying "that is gorgeous as is, why would you even touch that?"  Here is why.... I don't wear black!  If you want to learn why I don't wear black, click here or the link in the side bar.

     So, I pulled out my paints and got to work.  I first painted over the black sections very carefully with a brown metal acrylic paint.  I then very lightly painted the peacock blue color over the brown as to not get the blue in the creases.  
     Then, if you refer back to this post, I did the same technique on the whole necklace as I did the shoes.  Small dab of brown metal paint, a drop of water and a cotton rag.  I rubbed the blue sections as well as all of the gold so that it wouldn't be so shiny.....voila.  I now have my very own one-of-a-kind necklace that I love wearing and feel good in.

    You can see here in this picture that I chose to wear it and pair it with a chunky chain necklace over it to give it the substance I was going for.  I sure do love layering accessories and making things very unique to me and for them to suit me better.  The black and gold would have been gorgeous, but it isn't something that I would have felt comfortable wearing and that suited me.  By painting it the way I did, it has now become one of my favorite pieces that looks great with so many of my clothes.  What do you have in your closet that just isn't quite right on you?  Ever thought of how you can switch it up to work for you?  It is one of my favorite things to do to see how I can make something work better for myself.  I challenge you to try it if you haven't.

Monday, August 26, 2013

Hand-painted Leopard Shoes

          Do you love leopard as much as I do?  Leopard is my POWER pattern!  I feel very powerful and confident when I am in leopard, so that was of course my inspiration for these shoes.

          I purchased these little red beauties for a whole $2 from my local Facebook yard sale page. 
         Some people would think that there is nothing wrong with them, but they are just too bold for my style and coloring.  After buying them I thought "why did I even buy these?  I don't care for this color for me...."  But then I had a thought and I was bound to do it.....Hand painted leopard shoes!

       #1- The first step to creating this was to rub my shoes down with pure ACETONE.  NOT fingernail polish remover.  With a cotton rag, rub and rub to see if you can get the glossy finish off (sometimes it all comes off and sometimes you just can't get it off).  *please use rubber or latex gloves during this process and do it outside where it is ventilated.

       #2- The second step is to get your colors figured out.  I use Angelus leather paints that have to be ordered online.  The base color I chose to be Mustard and the spots are Cognac.
     The base I used a larger art brush & gave it a good 2-3 coats.  After letting that dry, I used the little paint brush in the paint and free handed some spots.  I created a free pattern as I wanted them to be a bit unique.
      After getting all of the spots on and letting it dry, I took the Light-brown paint and drew random borders around the spots.
     With this picture, you can see the random pattern.  It is really cool around the heel and didn't take it all around the shoe.

     My original plan was to just stop at this point, but as you can see, it was a bit bright and animated for my taste and I desperately needed to find a way that I could tone down the look.  Now, with part of my background being in mural painting and wall staining, I took some techniques from that and created an over color that would tone down the yellow and make it look aged.  Here is what I did.  In an old plastic bowl, I dabbed a little bit of the dark brown paint and a pinch of water.  I took a cotton rag and dabbed it both in the brown paint and water and created a wash out of it.  I swirled that all around the the shoes and created some spots darker and some lighter so get the aged/worn affect I wanted.
       You can see here in the picture that it created a very beautiful, yet fun look that I absolutely love and adore!
     I even wore them in a photoshoot I had back a few months ago.  So, for a few bucks for some shoes and some paints (that of course stretch into many more projects), I now have a FABULOUS pair of shoes that I get compliments on ALL THE TIME!  So try it!  Don't be afraid because you say you aren't an artist.  This is not difficult and the end result is well worth the bit of time put in.


Sunday, August 25, 2013

Getting Started

I am extremely excited to finally have taken the steps to get this up and running!  It has been a long time waiting as I have had MANY people out there wanting to learn how it is that I refashion all of my clothes and create a unique style for myself.  Check back for tutorials and outfit inspirations, it won't disappoint :-)