Monday, September 30, 2013

Red/Copper belt redo

Back last year, I bought this pink belt for about $5 from Charming Charlie.  
I loved the shape & texture, but the color was a bit soft & light for me.  I decided to get my paint on with it.
I painted the elastic band with fabric paint & a sponge while pounding the paint in as deep as I could, doing my best to get it as even as I could.  After painting the band with Brick fabric paint, I then took My Angelus Brick leather paint to the vinyl (after rubbing it with Acetone).  After that dried, I took my cotton rag with so e water & rubbed the whole vinyl down with Copper leather paint in order to give it a metallic iridescent sheen to it & to enhance the texture.  Painted the buckle rid with Gold nail polish & let it all dry.
The color & look are gorgeous!  Now that I have worn it a few times, I think I will paint the whole thing with Pod Modge to help seal it as the buckle has been digging in on the sides & ruining the belt. I think the Mod Podge would help protect it like it did in my Tissue Paper shoe post.
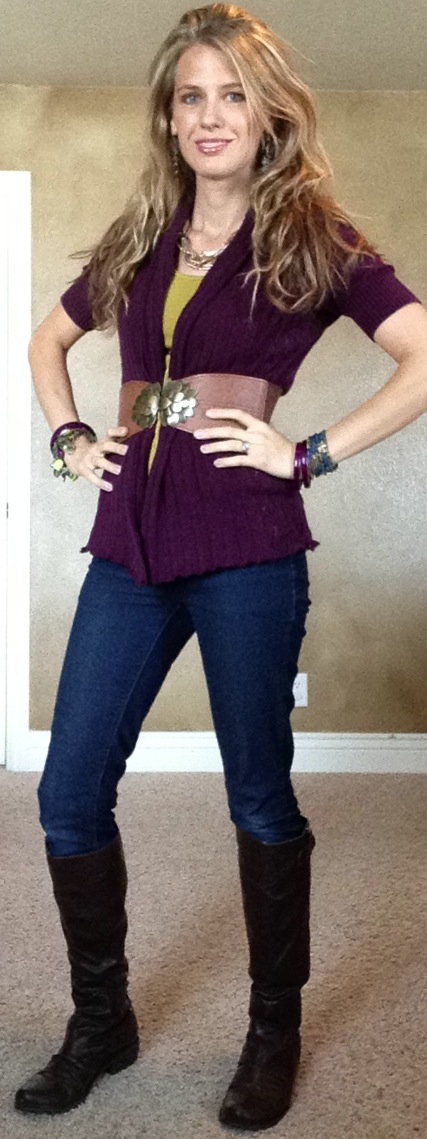
Here is the outfit I put together with the belt.  This is one of those outfits that I put together for the first time and felt AMAZING in!  My favorite shoes & skirt combined with a ruffled front button up shirt with a gold metallic cardigan & my painted belt.  I loved the whole outfit & how I felt in it and the belt was a great color for the combo.  Expand your vision & possibilities & see what you can come up with!


Thursday, September 26, 2013

Braided Scarf Ring

Remember back in this post I showed how I wrapped a plastic scarf ring with a braided belt?  I showed it on my wrist in the last post, but I actually intended it to be a functional scarf ring.  This is one of those great pieces to add a little extra detail to your fall wardrobes and all of the scarves that you will be wearing.  Here are 3 pictures of different ways to tie a scarf using the a scarf ring, or you can use a bangle bracelet


 I only showed 3 different ways to tie it, but there are NUMEROUS ways and they don't all go around your neck.  I may show more in another post, but I only had time to do 3 quick ones today.
There is a reason that leopards is part of the name of the blog.... I love my leopard!  But I am loving the weather we are having so that I can get out all of my layers.  These boots I am wearing may be going through a bit of a refashion coming up here in a few weeks, they are a bit of a greyed-brown and I would like them to be a bit more rich.

How can you spruce up your scarves this fall and winter?  I am sure I will be showing LOTS of different ways to wear scarves as they are the most versatile piece you can have in your wardrobe and can add so much.  Are you getting the cooler weather your way yet?  This is my favorite time of year!  :-)

Monday, September 23, 2013

Plain Tan Skirt Criss-cross sewing

 I bought this plain tan skirt back quite a few years ago.
It was alright, but I didn't choose to wear it much.  I mainly wore it when I was pregnant because it was stretchy and comfortable to fit on the belly.  but during my last pregnancy, I got it stuck in a metal folding chair and got grease on it that stained.
 The mark wasn't that big, but it was enough for me to not feel comfortable to wear it, but I had an idea on how to save it.
The first step was to get rid of the bow.  I don't like bows, so I just tied some knots  down the ties and sewed them straight across to create a knotted looking belt..... some texture.

The next step was to create some texture in the body of the skirt and to hide the grease mark.  This particular skirt is sewn in sections, so I just worked within each section.  I just folded over and sewed right along the edge, creating a tiny seam.
 I created a criss-cross pattern but did not do any measuring of at all.
I made sure to create a seam over the grease mark so to hide it and not make it noticeable.  I continued all the way around the whole skirt sewing random criss-cross patterns and working in each individual section of the skirt.
This shows it more close up,
and here it is in an outfit.  The texture is so great now and I can actually see myself choosing to wear this now.  I paired it with a new jacket top I bought at the thrift store a few days ago, the cuff from my last post and my great leopard belt I bought from a friend.  Where I live, it has been feeling more and more like fall which means that the layers will be piling on (but I love).  Best time of year for me ;-)

Saturday, September 21, 2013

Leather Cuff Refashion

I bought this great leather cuff off of the Yard Sale page back last year for a $1.  
It had super shiny rhinestones & silver studs that I didn't care for, so I painted them with gold & brown acrylic paint.  The rhinestones still weren't working for me, so I took a skinny brown leather belt from a pair of my maternity pants & cut it up to cover up the rhinestones.
I figured the sizes I needed & just literally hot glued them all into place.
Just to let you know, I did use brown metal paint for the hardware & it has been chipping off through time, so fingernail polish would probably be a better option.
I had left over braided belt, so I wrapped it around a plastic ring that a scarf I purchased was hanging on, 
And created a bangle bracelet OR, I actually made it with a different intention in mind that I will cover in a different post ;-).  So from this free belt taken from some pants, I was able to create 2 different accessories that are unique & of course one-of-a-kind which is what I always aim for ;-). 

Look for another post in the near future that will show multiple pictures of what the braided ring was actually made for.

I hope everyone has a fantastic weekend! 

Tuesday, September 17, 2013

Denim Blazer Overhaul

12 years ago I got a job at the Nordstrom Rack.  The best perk of course was the fact that I could get my hands on some great clothes at a discount.  This jacket was one of those "have-to-have" pieces.
Remember, I said 12 years ago ;-)  I wore it a few times and lost the tie belt and never wore it again.  I couldn't really get myself to get rid of it, yet I quite despised the length, the sleeves and the color..... but I altered it to fit me like a glove.  So of course this summer I took to it finally.  I started off by cutting the bottom off like I did in this post, then the sleeves had to go.  I fold the jacket in half and used my straight edge and rotary cutters on all of it, making sure it was even on both sides.  Since I love raw edges, I just left them as they really were perfect for me.  The next step was to give it a dark dirty bath.  If I remember correctly, I used a tan, small amount of Sunshine orange and a small amount of dark brown.  The results were amazing.
It really is amazing how those few fairly simple steps completely transformed this piece.  It went from looking old and outdated, to very hip and stylish.

Here I show it with a big belt over and paired with my refashioned skirt.  I bought this skirt off of the FB Yard Sale page for a few dollars, but it was way too big and was a white and grey striped coloring.  Gave it a tan bath and while wearing the skirt inside out, pinned it down the front to get a perfect fit to my body and curves.

The result is a perfect edgy skirt that was pretty much made for me.  I adore this outfit and get compliments like crazy when I wear it all together.

Monday, September 16, 2013

Marbleizing Dye Technique

This shirt is going to be the shirt that goes down in history for having the most refashions done to it!  It started out like this....
 GORGEOUS, teal black that I really did love, but every time I wore it, it felt way too black for me and I didn't feel quite right... but that teal color is my FAVORITE!  I thought I could bleach it and just turn it back solid teal.....
 So, I bleached it.  It turned tan.
 Attempted to bleach it teal with a Kelly Green and Royal Blue mixture and it turned out this color.  VERY muted and I was not loving....
 So in a very short period of time, it visited all 3 of these.  I left it that muted green for a while, but never wore it because I really didn't like the color for me.... so why not bleach it again and try something different.

(picture forgotten here)- but I took it in it's bleached tan state and wrapped rubber-bands all over it.  I tried to do it at angles so that there wouldn't be stripes straight across, I wanted lots of texture and movement, not stripes.  I then stuck it in a seriously concentrated mixture of Scarlet Red dye.
 This is what it looked like when all soaked in and wrapped up still.  I undid all of the rubber-bands and this is what I had.
 A really great rich red and tan, but it still needed to be washed at this point (yes it did fade and bleed, but whatever at this point ;-) )
 The next matter of business was the black rhinestones.  I couldn't stand them anymore and decided to take my brown finger nail polish and quickly coat each one with the brown.  You can see that the left upper section has brown and the right is black still.  It was just that bit of change to tone it down and not be so stark.
 Here is it outfitted.  You can see that it did fade and I have to admit I was bummed about how much it faded.... I LOVED the deep rich red it started out to be, but sometimes it is just really hard to get the really deep coloring with dyeing.  At least it is to a point that I will for sure wear it often.  This shirt is so blasted soft and comfortable, that I wasn't willing to give it up.
I paired it with this fabulous belt that my neighbor picked up at the thrift store and gave to me.  I didn't have to do a thing to it, it was perfect as is.... it's amazing how someone considered this trash I consider a serious SCORE!  I would have paid decent money for a belt like this because it would be a staple!  The boots were a great find for about $6 at a Yard Sale.... The shirt itself was a thrifted find also, originally from the Buckle I believe.  A store I love but never willing to pay their prices.

So I am calling it quits for this shirt.  I think 5 refashions is enough for 1 shirt.  Aren't you glad you have me to make mistakes and test things out for all of you so you know what to do and what not to do..... ;-)

Friday, September 13, 2013

Sweater Cut Off

I don't know about you, but on occasion, I have clothing items that I LOVE, but there is something off & it doesn't feel right when on .  This sweater is one of those items for me.  It is this GORGEOUS rich purple that I love the color of along with the pattern, but the length always drove me batty and made me feel extremely frumpy. 
 When I put it on, it hit me mid thigh and I didn't like how it looked on me.

 I had the idea that I would hem it so that I could keep the ribbed edge on the bottom, but when I went to go line it all up and pin it, I saw that the bottom was wider than the upper part where I wanted the bottom to be... so.......


 I just laid it down on my cutting mat and cut a straight edge where I wanted the edge to be.  I then went on my sewing machine and sewed a zigzag edge to help prevent fraying and the sweater to come unraveled.


I actually quite like the raw edge look in general and this one didn't disappoint.  It gave a bit of a ruffled look and I like how easy and fast it was.


 I have wanted to cut this shorter for quite some time and I am glad I finally took the time to do it.  This will be a great sweater to wear this fall.  I bought the sweater about 2 years ago, but didn't wear it last year because of how frumpy I felt in it when it was long.

Here I have it paired with my favorite simple knee high boots, simple stretchy skinny jeans from Forever 21, favorite chunky belt, lots of bracelets/bangles that I got from other people and a fun accent green shirt underneath for a pop.

I have many more sewing/cutting projects to come.  We cover it all on this blog ;-)

Wednesday, September 11, 2013

Corduroy Jacket Dye

I bought this jacket on my local FB Yard Sale page back last fall for $1.  In the picture, it looked tan.  When I arrived to pick it up, I wasn't happy about the color, but bought it anyway.  
I tried giving it a dirty dye bath, but that still didn't give the color I wanted
SO, I went with a brighter color by giving it a bath in some Kelly Green dye.  The color took beautifully & I am happy with the way it turned out.
Here I have it paired with jeans, a tank I got from a friend, shoes & brown cuff from the FB Yard Sale page for $3 each. The other bracelet is a coil one I made.  A very inexpensive outfit, even though I have quite a bit on..... LOVE creating outfits on a budget!

Thursday, September 5, 2013

Jean Stitching Continued

Something that I want to do with every post, is show that item in an outfit.  This gives ideas as well as show that I really do wear these items in everyday life!  No one would know that I alter my stuff if I didn't point it out to them.  But I forgot to share an outfit on the post that showed sharpies to jean stitching. 
So here is a pair of jeans I purchased off of my local FB yard sale page for $8.  I almost didn't buy them because of the stitching, but once I tried the sharpie on these, I was hooked..... This pair I used the cheaper permanent marker & it works better than Sharpie.  You can see here, months later, that it is still holding it's color great!  My Sharpie ones have faded much more after washes.
I paired them with this fab shirt my friend sold me for a few dollars along with a clearance necklace from Forever 21 & my favorite ancient Old Navy wedges I got for $10 & have been a staple for years!  So as you can see, spent very little money for an outfit that I feel amazing in!

Wednesday, September 4, 2013

Leopard Tissue Paper Shoes Refashion

This is a project I started on a few weeks ago, but just didn't have the time to finish it up until this past weekend.  I have had people waiting to see how this one turned out.... I think they were doubtful that it would turn out, but it turned out AWESOME!!!
 I started off with these pink shoes that my dad gave to my girls for dress ups from the thrift store (they have lots of dress up shoes, so they did not need another pair.... so naturally, I took them ;-) )

I had these leopard tissue paper sheets that came in some packages I had ordered and desperately wanted to think of something to use them for.... so of course, why not SHOES!

I started this process by painting sections of the shoe with some Mod Podge and tearing fairly small pieces of the tissue paper and sticking it on.  I was careful not to get Mod Podge on the sole of the shoe so that when it came time to cut it with an exacto knife, it wouldn't be glued on the sole and would give me a clean edge.  Up at the top area, I wrapped the tissue paper to the inside and glued it down with the Mod Podge.
After everything is glued down,  take your Mod Podge and coat the entire top of the tissue paper making sure to completely seal the whole thing.  Let it dry and exacto knife the edges off very carefully.  Next, paint the heel and the straps with Cognac leather paint.  it takes a couple of coats to really get a nice look, then paint the buckle with gold fingernail polish.  As you can see above, I undid the buckle to get everything painted.  One thing I have noticed from projects, leather paint doesn't hold up under any buckles, it rips it off and ruins the whole thing, so this time I decided to cover the whole strap with Mod Podge to protect it and it is working out great

I am super excited with how they turned out!
Definitely one-of-a-kind shoes that will be great for dressing up or pairing with jeans like I did here.
The jeans, jacket & brown cuff here are thrifted from friends or my local FB Yard Sale page, scarf was a cheap find at Walmart.  Super inexpensive, yet fun and colorful outfit for the fall approaching..... and I am LOVING these shoes!  So fun to see people's reactions when I tell them I refashioned them with tissue paper!

Tuesday, September 3, 2013

Denim Bleach

I hope everyone had a great Labor Day weekend!  I headed up to our cabin with my family and while up there, I worked on a project I hope to finish and have posted this week, so stayed tuned ;-)

I purchased these denim leggings from Forever 21 last year.  I wore them quite a few times, but decided that the color was just way too saturated for me and needed to be a lighter color.  They really were almost a black/blue denim.
 I decided to throw them in my washing machine on the soak cycle with about a 1/3-1/2 cup of bleach to see what would happen.
To my surprise, they turned out this awesome blue color, which I then dipped into a tan dye just to give them a bit of dirty affect.
 Here is the Before and After
and today I paired them in a casual look as it was my 2 older girls first day of preschool and there was going to be lots of running around, as well as my 2 year old burned the bottom of her foot this weekend and got the biggest blister I have ever seen, which means I am carrying her everywhere.
I needed to be comfortable to do all of the running around and all of the carrying that needed to be done with my 3 little girls.  I am extremely big on the fact that you can still be a mommy-on-the-go and dress in cute, comfortable clothes that are not work out or lounge clothes.  
Not only am I really big on making things work, but I am really big on thrifting also.  This cardigan I purchased on my local Facebook Yard Sale page for $5 and then dunk it in a dirty tan dye to take out the white, my white shirt also got a tan dye and the necklace I am wearing was given to me by a sweet friend who knew I would love it.  The green braided cuff was a make a while ago out of the sleeves of a shirt I cut up and the wood cuff I I bought on ebay for $3.  I love creating outfits on little money and making things work for me!